I used Photoshop 7.0 for scan reconstruction/post production and Painter 9.0 for watercolors.
Preparation: Scan Extension
I started off with this scan of Takamichi's artwork. Since this artwork was vertical, I basically had to redraw a bunch of cherry tree branches. You can see that process in this breakdown by layers.
The "sketch" layer was used to get a feeling for where I should start adding or extending the branches so that the wall felt full, and I didn't feel obliged to follow it too closely.
The "flowers" layer consists of 2 different flower sets extracted from the original scan, repeated at different intervals. In order to keep it from looking regular, I rotated most of the clones and resized them. As long as you can keep from creating a pattern, you should be able to distract the eye enough that people won't realize the flowers are cloned for a while.
Preparation: Setting up Painter
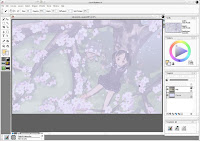 First, I set up the Painter interface. I took the extended scan from Photoshop and saved it as a bitmap. I opened this in Painter, moved the image from the background to a layer on top, reduced the opacity to 25% and locked it to prevent myself from accidentally moving or painting on it. I also set the background to a pale blue color. That way I'd know where I'd painted and where I hadn't.
I had the original bitmap open again so I could use it as my clone source. Then I set up my watercolor brush to clone and was ready to start painting!
Branch painting 1 - coloring the inside
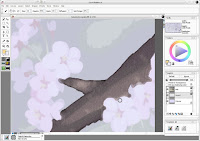 To start painting the branches (which are outlined) I first painted the inside of the branch with a 3-5px brush. You can see in the screenshot that the strokes overlapped the flowers. As long as the center of the brush doesn't cross over the edge of the flower, it will continue to paint in brown (that's why I use a larger brush.) I'll clean up the flowers' edges later, but this ensures there are no gaps.
Branch painting 2 - coloring the outside
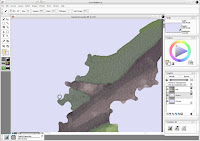 To continue painting the branches, I next painted the outside of the branch (the grassy area) with a 3-5px brush. I overlapped the grass over the edge of the branch similar to how I overlapped the flowers' edges in the previous step.
Branch Painting 3 - coloring the edges
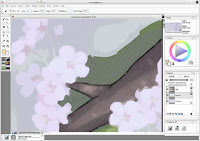 With a 1px brush, I went back and cleaned up the edges of the branch, making sure that I covered up all of the overlapping grass from the previous step. The 1px brush is laborious to use and usually too sharp for a good watercolor effect, so use it sparingly for the most fine of details, and stick with 3-5px brushes for most other parts (or for large swathes of grass, use 10-15px brushes to save time.)
Flower painting
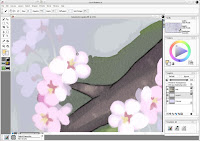 Painting the flowers uses the same ideas as painting the branches, except the flowers have no black edge on them. Start by painting from the center outwards. Since the branch painting steps already created an overlap, paint over the branch to create a nice crisp edge for the flowers. For the flower petals I used a 3-4px brush, and for the flower pistils/stamens, I used a 2px brush. For flower stems, I used a 1-2px brush.
Tree painting
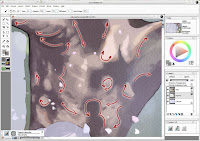 Painting the tree is similar to painting the branches. Where branch texture tends to go in one direction, however, the trunk of the tree has textures going in all directions. When painting a section like a tree trunk, always keep in mind which direction your brush strokes should go in to maintain a good edge and transition between colors.
Painting the girl
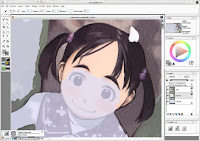 Painting the girl is just like painting the rest of the wall. However, the girl has the most details, so you'll want to be very careful with edges and corners. This is about the only place where I used the 1px brush extensively.
Done!
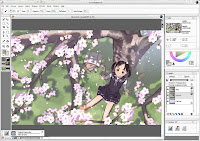 Keep painting and painting and eventually you'll finish!
You might notice that I redid the grass on the left side of this screenshot compared to the Painter prep screenshot. After watercoloring the grass, the scan extension didn't mesh well with the scan, so went back and added more details, more gaps in the shadows, and more variations in the green. I thought I could be lazy, but that didn't work out.
Post-Production
After I finished watercoloring, I saved it as a bitmap again and opened it up in Photoshop for post-production. This involved some color and level adjustment (I toned down the saturation of the image and skewed it towards pink) and adding some extra watercolor texture (so that even the white areas show texture, as you might expect from seeing a watercolor on paper), and added some text (which took a while to figure out.) Then you're ready to export as jpegs and post it for all to see.
Well, that's one way you can create a wallpaper that looks like it was watercolored. Hope you learned something along the way, or at least had fun seeing how this wall was put together.