I'm hoping to start up a new series in this blog called Walltips. They'll be short posts related to any walls I add. I plan for them to range from topics such as techniques used in the walls to discussion of layouts, colors, in-progress screenshots, decompositions, and whatever else I feel like rambling on about. So in today's inaugural Walltip from the wallpaper Monster, quick and easy grunge textures!
This is a simple technique to grungify a layer or layer grouping. It basically knocks a bunch of holes in the layer so that other layers can peep through. It uses layer masking and some basic Photoshop filters, and has plenty of room for experimentation.
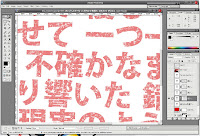
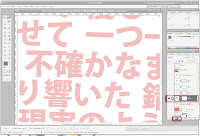
1. First off, on the layer (or layer group) you're interested in grungifying, you'll need to add a layer mask (not a vector mask, just a straight up layer mask.)
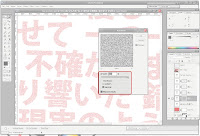
2. Add noise to the layer mask with the Noise filter. Crank it up to the max (400% in Photoshop 7) and make sure that you're using a Gaussian pattern and that the noise is Monochrome.
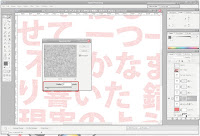
3. Blur the layer mask with the Gaussian Blur filter. The amount of blur you use will determine how patchy the grunge texture is as well as the size and distribution of the patches. Smaller blurs will result in speckled grunge. You probably don't want anything about 5px.
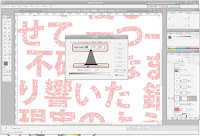
4. Adjust the layer's levels from the Image>Adjustments menu. You should see a hill figure, and 3 triangular sliders underneath. You'll want to concentrate all three sliders near each other, as this will create sharper edges on your grunge. If you concentrate the sliders near the left of the hill, you'll get sparse patches; if around the right of the hill you'll get dense patches. Adjust as you see fit.
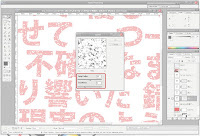
5. Add some randomness to your grunge by using various Photoshop filters on the layer mask. You'll want filters that work well on black/white layers. Some good filters to start out with include most of the Brush Strokes filters, some of the Texture filters and some of the Sketch filters. Play around with their settings until you get something you like. You can apply multiple filters or none at all.
6. You're done!
Screenshots of me applying grunge to a text layer (which ultimately did not make it into the final wall) based on the steps above, with areas of interest highlighted:
May 30, 2008
1 new wallpaper (Full Metal Alchemist - Monster)
1 new wallpaper:
Full Metal Alchemist - Monster (Pop Art)
So I figured I'd celebrate DA!'s 8th birthday with a bishounen wall, and I liked the uber-angsty pose of Edward in this scan and the fact you couldn't see his face. Plus: BELLYBUTTON. Anyway, Ellegarden's alternative stylings are totally super emo-factor and perfect for the wall, so I chose the song "Monster" as the theme... [more]
May 25, 2008
Happy 8th Birthday, DA!
DA! turns 8 years old today. It's rather a scary thought that I've had this site around for that long. It started when I was just entering college, and now I've already got a Masters degree and have been at my job at Google for over two years. Just crazy.
Anyway, as with previous birthdays, I celebrate by giving DA! a new layout. This year, I decided to go extremely over-the-top with Web 2.0 sensibilities (or insensibilities depending on your views.) This means shiny chrome, lots of soft gradients, and oodles of reflections everywhere. I was originally going to keep the rotating headers, but never found any other images that seemed to fit the header as well as the Kino no Tabi image that currently graces the top. I figured the slick 2.0-style UI was a nice about-face from the previous Zen, Chinese classical layout, of which I remain quite fond of (I almost wanted to keep it for another year, but decided that change was still good.)
I removed the resource section, since I hadn't updated it since two versions ago, and wasn't really planning to ever do so. I replaced it with a local syndication of this blog, mostly because one of the things I've learned to do at work is syndicate Blogger feeds in all sorts of static HTML files. I've always wanted to integrate the blog more into the look and feel of the website, and with Blogger feeds this is really easy. Of course you can still view the blog on Blog*Spot if you feel so inclined. This ensures that all sections of the site remain fresh and interesting.
Well, I'm off to another day at Fanime con. Hopefully I'll finish my next wall in a few days, but as you can see, I was a bit busy with this redesign.
Subscribe to:
Posts (Atom)